Pages

Friday, June 10, 2011

HOW TO USE IMAGES IN A JEE6 PROJECT?(Most common approaches)


<h:graphicImage id="img" value="/images/download.gif" alt="The image could not be found."/> 

A browser loads each image by sending an HTTP request for the resource.
Resources that are under the WEB-INF directory can not be directly retrieved via an HTTP request.

You have several options:
1. Move the images directory such that it is under the WebContent directory, but is not under the WEB- INf directory. For example, *WebContent/images*


2.    Intercept requests for images in a servlet or filter, read the file from within the servlet or filter, then return the file. There are 3rd party implementations of this.If you dont want to write your own servlet for this, Im sure with a bit of search you can find a servlet that suits your needs in google.

HOW TO CREATE YOUR OWN CAPTCHA WITH JSF

1-Create a servlet

//This can be located at a package called servlets(next to entities and managed beans)
public
class MyCaptcha extends HttpServlet{

      private int height = 0;

    private int width = 0;

    public static final String CAPTCHA_KEY = "captcha_key_name";


   @Override

    public void init(ServletConfig config) throws ServletException {

        super.init(config);

        height = Integer.parseInt(getServletConfig().getInitParameter("height"));
        width = Integer.parseInt(getServletConfig().getInitParameter("width"));
    }

    @Override
    protected void doGet(HttpServletRequest req, HttpServletResponse response) throws IOException, ServletException {
        //Expire response
        response.setHeader("Cache-Control", "no-cache");
        response.setDateHeader("Expires", 0);
        response.setHeader("Pragma", "no-cache");
        response.setDateHeader("Max-Age", 0);

        BufferedImage image = new BufferedImage(width, height, BufferedImage.TYPE_INT_RGB);
        Graphics2D graphics2D = image.createGraphics();
        Hashtable<TextAttribute, Object> map = new Hashtable<TextAttribute, Object>();
        Random r = new Random();
        String token = Long.toString(Math.abs(r.nextLong()), 36);
        String ch = token.substring(0, 6);
        Color c = new Color(0.6662f, 0.4569f, 0.3232f);
       GradientPaint gp = new GradientPaint(30, 30, c, 15, 25, Color.white, true);
        graphics2D.setPaint(gp);
        Font font = new Font("Verdana", Font.CENTER_BASELINE, 26);
        graphics2D.setFont(font);
        graphics2D.drawString(ch, 2, 20);
        graphics2D.dispose();

        HttpSession session = req.getSession(true);
        session.setAttribute(CAPTCHA_KEY, ch);

        OutputStream outputStream = response.getOutputStream();
            ImageIO.write(image, "jpeg", outputStream);
        outputStream.close();
    }

}

2-Add the following settings to your web.xml:
<servlet>
            <servlet-name>Captcha</servlet-name>
            <servlet-class>servlets.MyCaptcha</servlet-class>
            <init-param>
                  <description>passing height</description>
                  <param-name>height</param-name>
                  <param-value>30</param-value>
            </init-param>
            <init-param>
                  <description>passing height</description>
                  <param-name>width</param-name>
                  <param-value>120</param-value>
            </init-param>
      </servlet>
      <servlet-mapping>
            <servlet-name>Captcha</servlet-name>
            <url-pattern>/Captcha.jpg</url-pattern>
      </servlet-mapping>

3- Add the captcha markup at the front page
<h:graphicImage id="capimg"
                                    value="#{facesContext.externalContext.requestContextPath}/../Captcha.jpg" />
                              <br />
                              <h:outputText value="*Napisite text koj vidite u slici " />
                              <h:inputText id="captchaSellerInput"
                                    value="#{registrationControllerSeller.captchaSellerInput}" />


4- Add the backing bean logic of the captha:

HttpServletRequest request = (HttpServletRequest) FacesContext
            .getCurrentInstance().getExternalContext().getRequest();
            Boolean isResponseCorrect = Boolean.FALSE;
            javax.servlet.http.HttpSession session = request.getSession();
            String parm = captchaSellerInput;
            String c = (String) session.getAttribute(MyCaptcha.CAPTCHA_KEY);
            if (parm.equals(c)) {
                 //CAPTCHA CORRECT INPUT
            }
           
else {
                //CAPTCHA INCORRECT INPUT  
            }


Glassfish 3 integrated database. What a great tool!

The database is one of the most important parts in almost every web project. It allows to store persistent data, for further use or analysis. Most of today web applications would be useless without a database.

Soon after starting using glassfish server, i discovered that there is a great tool already included in this server.
The Derby database. In this post i want to give you a quick tutorial, on how to configure it to be able to use it with your JEE6 application and the eclipse IDE.

STEP 1 DEFINE A DRIVER TO CONNECT TO APPACHE DERBY
The driver will be used by our web app to connect to the database, depending on the database vendor, the driver is different. The driver we need should be found in the glassfish application server file system.

Prerequisites:
Install appropriate versions of Eclipse, Data Tools Platform, EMG, GEF, and Apache Derby. If necessary, switch to the Database Development perspective.

You can also create the driver definition when creating the connection profile.
  1. Select Window > Preferences from the main menu bar.
  2. Expand Data Management > Connectivity and select Driver Definitions.
  3. Click Add.
  4. In the Name/Type tab, indicate the version of Derby on which you want to create the driver definition.
    1. Select Derby for the Vendor Filter to narrow the display to only Derby driver definitions
    2. Select Derby Embedded JDBC Driver for the version of Derby you have installed.
    3. (Optional) Modify the Driver Name if a driver definition with this name already exists.
  5. In the JAR List tab, highlight the default derby.jar file and click Edit JAR/Zip to indicate the fully qualified path of the Derby JAR file.
    1. Browse to the location of the ZIP file.
    2. Click Open.
  6. (Optional) In the Properties tab, modify the default properties for the driver definition template.
Note: Options in the Properties tab vary based on database server type. You can edit or enter a property in the Value box.

  1. Click OK.
 NOTE: THE driver.jar is for emdebed database while driverclient.jar is for normal database(driverclient should be used).
STEP 2 CREATE THE DATABASE
I found a great tutorial on using Glassfish v3 with Eclipse at http://programming.manessinger.com/tutorials/an-eclipse-glassfish-java-ee-6-tutorial/ . Here I will summarize how to create a Derby DB in eclipse and how to configure connection pool and JDBC resources using the Glassfish Administration Console.

Before doing this make sure that the Glassfish preference Start the JavaDB database process when Starting GlassFish Server is ticked.

First we have to create the Derby Database, in eclipse is very simple. Go in
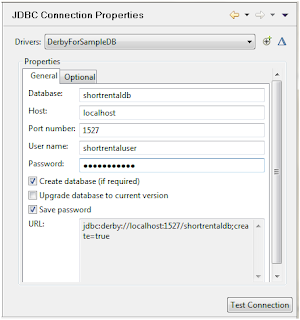
 Data Source Explorer tab and on the contextual menu of Database Connection select new. Now select Derby as Connection Profile Type and set the name of the database, for example ShortRental Database. 
Now in the next step set the database properties as in figure:


(Don’t close this window and click ok until you don’t finish in the administrator console)


Now start the GlassFish server and connect to the administration console (the default port is 4860) and go toResources / JDBC / Connection Pools. Now create a new Connection Pool. Set the parameters as in figure:

Now pass to the next step, leave the properties at bottom as they are, and set the advanced properties as in the Derby DB, see the next screenshot:


At this point the configuration is completed, make sure the Ping checkbox is enabled and now you can try to ping the database.

The last operation to do is to define a JNDI name for access the database. Go to
 Resources / JDBC / JDBC Resources, add a new one and connect it to the just cretaed pool.


The last step would be in our eclipse project add a new JDBC resource.(File>New>Other>JDBC Resource)


When interacting with the database, it is likely to get a JNDI error regarding to the pool name, to fix it you have set the attribute  pool-name to exact the same pool name as you gave in the glassfish admin panel. 
(Example: ShortRentalPool)

Sunday, February 13, 2011

Adding very basic AJAX Support to our JSF 2.x pages.

The last couple of days i tried to find out how to add AJAX support to my JSF UI components, so i can update them without refreshing the page... and also because other benefits of using AJAX.

A couple of guys from stackOverflow helped me out, and it was a complete success.

1-This is the selectOneMenu where the user picks a desired item
<h:selectOneMenu value="#{searchController.selectedCategory}">
<f:selectItems value="#{searchController.formatedCategories()}"></f:selectItems>
<!-- in f:ajax listener is not needed, but we can add it if we need it -->
<f:ajax event="change" execute="@this" listener="#{searchController.selectedCategoryMenu}"
render="menuType" />
</h:selectOneMenu>


2-This is how the new element that needs to be rendered looks like(The rendered attribute controls when each panel should be rendered)

<h:panelGroup id="menuType">
<h:panelGroup rendered="#{searchController.selectedCategory == 'cat1'}">
                                 //...
</h:panelGroup >
                         <h:panelGroup rendered="#{searchController.selectedCategory == 'cat2'}">
                                 //...
</h:panelGroup >
                        <h:panelGroup rendered="#{searchController.selectedCategory == 'cat3'}">
                                 //...
</h:panelGroup >
</h:panelGroup>


3(Optional)-Handling the change even in the managed bean

public void selectedCategoryMenu(AjaxBehaviorEvent e) { //...
}

This was my first experience combining JSF and AJAX. I was surprised how easy it was, a way easier than i thought.

Sunday, February 6, 2011

Mercurial installation bug

For those who use Mercurial as a project management tool:

The other day i was installing Mercurial from http://mercurial.selenic.com/
And i found that in winXP, when doing "hg commit" or "hg ci", this latest version returns an error, that says:
no username supplied (see "hg help config")
The solution is to add the following lines of code inside the file mercurial.ini:


[ui]
username = "your windows user name" (no quotes)

The file can be found at:
 C:\Program files\Mercurial\mercurial.ini
For some reason, the instalation does not add that information to the .ini file

Tuesday, February 1, 2011

web programmers most powerful weapon

The MVC(Model View Controller) Pattern
Today the most of the existing web frameworks that exist since web 2.0 support separation of concerns by using variations of the MVC pattern. It is an architectural pattern used to isolate business logic from user interface.


Model: The model is represented by the content(often stored in a DB) and it is displayed by the view.
It should be created without concern of its look and feel.
Examples: Entities that use ORM technologies, other backup classes that are included in the domain model, EJB calls...

View:The view are all the parts of the application that the user sees. We could say that it is the model presented graphically.
Examples: XHTML, WML and others...

Controller:The controller is the part that recives the infromation from the View about the desires of the user. The controller gets, converts, validates the data, invokes bussiness logic and generates the markup for the view to display.

In the image below you can see how each part should interact.

Share with your friends