
The database is one of the most important parts in almost every web project. It allows to store persistent data, for further use or analysis. Most of today web applications would be useless without a database.
Soon after starting using glassfish server, i discovered that there is a great tool already included in this server.
The Derby database. In this post i want to give you a quick tutorial, on how to configure it to be able to use it with your JEE6 application and the eclipse IDE.
STEP 1 DEFINE A DRIVER TO CONNECT TO APPACHE DERBY
The driver will be used by our web app to connect to the database, depending on the database vendor, the driver is different. The driver we need should be found in the glassfish application server file system.
You can also create the driver definition when creating the connection profile.
NOTE: THE driver.jar is for emdebed database while driverclient.jar is for normal database(driverclient should be used).
(Don’t close this window and click ok until you don’t finish in the administrator console)
Now start the GlassFish server and connect to the administration console (the default port is 4860) and go toResources / JDBC / Connection Pools. Now create a new Connection Pool. Set the parameters as in figure:

The last step would be in our eclipse project add a new JDBC resource.(File>New>Other>JDBC Resource)
When interacting with the database, it is likely to get a JNDI error regarding to the pool name, to fix it you have set the attribute pool-name to exact the same pool name as you gave in the glassfish admin panel.
(Example: ShortRentalPool)
Soon after starting using glassfish server, i discovered that there is a great tool already included in this server.
The Derby database. In this post i want to give you a quick tutorial, on how to configure it to be able to use it with your JEE6 application and the eclipse IDE.
STEP 1 DEFINE A DRIVER TO CONNECT TO APPACHE DERBY
The driver will be used by our web app to connect to the database, depending on the database vendor, the driver is different. The driver we need should be found in the glassfish application server file system.
Prerequisites:
Install appropriate versions of Eclipse, Data Tools Platform, EMG, GEF, and Apache Derby. If necessary, switch to the Database Development perspective.You can also create the driver definition when creating the connection profile.
- Select Window Preferences from the main menu bar.
- Expand Data Management Connectivity and select Driver Definitions.
- Click Add.
- In the Name/Type tab, indicate the version of Derby on which you want to create the driver definition.
- Select Derby for the Vendor Filter to narrow the display to only Derby driver definitions
- Select Derby Embedded JDBC Driver for the version of Derby you have installed.
- (Optional) Modify the Driver Name if a driver definition with this name already exists.
- In the JAR List tab, highlight the default derby.jar file and click Edit JAR/Zip to indicate the fully qualified path of the Derby JAR file.
- Browse to the location of the ZIP file.
- Click Open.
- (Optional) In the Properties tab, modify the default properties for the driver definition template.
Note: Options in the Properties tab vary based on database server type. You can edit or enter a property in the Value box.
- Click OK.
STEP 2 CREATE THE DATABASE
I found a great tutorial on using Glassfish v3 with Eclipse at http://programming.manessinger.com/tutorials/an-eclipse-glassfish-java-ee-6-tutorial/ . Here I will summarize how to create a Derby DB in eclipse and how to configure connection pool and JDBC resources using the Glassfish Administration Console.
Before doing this make sure that the Glassfish preference Start the JavaDB database process when Starting GlassFish Server is ticked.
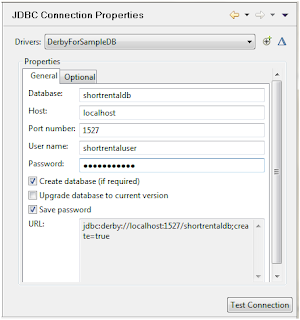
First we have to create the Derby Database, in eclipse is very simple. Go in Data Source Explorer tab and on the contextual menu of Database Connection select new. Now select Derby as Connection Profile Type and set the name of the database, for example ShortRental Database.
Now in the next step set the database properties as in figure:
Before doing this make sure that the Glassfish preference Start the JavaDB database process when Starting GlassFish Server is ticked.
First we have to create the Derby Database, in eclipse is very simple. Go in Data Source Explorer tab and on the contextual menu of Database Connection select new. Now select Derby as Connection Profile Type and set the name of the database, for example ShortRental Database.
Now in the next step set the database properties as in figure:

(Don’t close this window and click ok until you don’t finish in the administrator console)
Now start the GlassFish server and connect to the administration console (the default port is 4860) and go toResources / JDBC / Connection Pools. Now create a new Connection Pool. Set the parameters as in figure:

Now pass to the next step, leave the properties at bottom as they are, and set the advanced properties as in the Derby DB, see the next screenshot:

At this point the configuration is completed, make sure the Ping checkbox is enabled and now you can try to ping the database.
The last operation to do is to define a JNDI name for access the database. Go to Resources / JDBC / JDBC Resources, add a new one and connect it to the just cretaed pool.
The last operation to do is to define a JNDI name for access the database. Go to Resources / JDBC / JDBC Resources, add a new one and connect it to the just cretaed pool.
The last step would be in our eclipse project add a new JDBC resource.(File>New>Other>JDBC Resource)
When interacting with the database, it is likely to get a JNDI error regarding to the pool name, to fix it you have set the attribute pool-name to exact the same pool name as you gave in the glassfish admin panel.
(Example: ShortRentalPool)
No comments:
Post a Comment