Pages

Wednesday, June 15, 2011

Connecting to a database using JDBC

Two college friends asked me to create a "Hello World" level pragmatical explanation of how a java system can connect to a database and interact with data. Also i've been told, to use any java api or tool i wish to achieve this task.

I think the easiest way to make a demo of how to connect to a database, is to use the JDBC api, that is included in the JSE-SDK since years. Also i think that for a learning purposes and better understanding of how java works with databases, this would be the best(Instead of using ORM tools like Hibernate or JPA)

Ok, lets get started:

Prerequisites:
-The java SE JDK
-
An IDE(I suggest you eclipse)
-A database driver(More info about JDBC drivers )
-A database server(For its simplicity to use, i would recommend you  Microsoft SQL 2005)

The source code:


1:  import java.sql.Connection;  
2:  import java.sql.DriverManager;  
3:  import java.sql.ResultSet;  
4:  import java.sql.SQLException;  
5:  import java.sql.Statement;  
6:  public class DB {  
7:   public void dbConnect() {  
8:   Connection con = null;  
9:   Statement stmt = null;  
10:   ResultSet rs = null;  
11:   String connectionURL = "jdbc:sqlserver://127.0.0.1;databaseName=forJDBC;user=george;password=george;";  
12:   try {  
13:    Class.forName("com.microsoft.sqlserver.jdbc.SQLServerDriver");  
14:    con = DriverManager.getConnection(connectionURL);  
15:    System.out.println("Connected!");  
16:    String SQL = "SELECT * FROM Samples";  
17:    stmt = con.createStatement();  
18:    rs = stmt.executeQuery(SQL);  
19:    while (rs.next()) {  
20:    System.out.println();  
21:    System.out.println(rs.getString(1) + "-" + rs.getString(2));  
22:    }  
23:   } catch (SQLException e) {  
24:    e.printStackTrace();  
25:   } catch (ClassNotFoundException e) {  
26:    e.printStackTrace();  
27:   } finally {  
28:    if (rs != null) {  
29:    try {  
30:     rs.close();  
31:    } catch (Exception e2) {  
32:     e2.printStackTrace();  
33:    }  
34:    if (stmt != null) {  
35:     try {  
36:     rs.close();  
37:     } catch (Exception e2) {  
38:     e2.printStackTrace();  
39:     }  
40:    }  
41:    if (con != null) {  
42:     try {  
43:     rs.close();  
44:     } catch (Exception e2) {  
45:     e2.printStackTrace();  
46:     }  
47:    }  
48:    }  
49:   }  
50:   }  
51:  }  
Explanation:


1- The first thing we need is to add the JDBC driver that will allow us to connect to the database into the projects builth path:


2.1-Make sure the database server is started.(Make sure you have logged in as an administrator)


2.2- Create a table in the database and add some data.
In this example i will not create the tables programatically. You can do it your selves with SQL Management Studio or similar tool. Just create a Database that meets the configuration above, and add two it a table called Sample with to VARCHAR fields. If you want to know more about how to programatically create tables with JDBC follow this link: http://www.roseindia.net/jdbc/jdbc-mysql/CreateTable.shtml


3-Create a connection URL:


1:  String connectionURL = "jdbc:sqlserver://127.0.0.1;databaseName=forJDBC;user=djoleP;password=djoleP;";  

4-Find the driver located path the ClassPath (if needed)

 Class.forName("com.microsoft.sqlserver.jdbc.SQLServerDriver");  

5-Connect to the database

 con = DriverManager.getConnection(connectionURL);  
 System.out.println("Connected!");  

6-Create a SQL Querry and an Statement, to be able to execute the query

1:  String SQL = "SELECT * FROM Samples";  
2:    stmt = con.createStatement();  
3:    rs = stmt.executeQuery(SQL); 


6-Extract data until the result set is empty

1:  while (rs.next()) {  
2:    System.out.println();  
3:    System.out.println(rs.getString(1) + "-" + rs.getString(2));  
4:    }  


7-Close the result set, connection and other streams that you might open(The transaction is finished!)


1:  finally {  
2:    if (rs != null) {  
3:    try {  
4:     rs.close();  
5:    } catch (Exception e2) {  
6:     e2.printStackTrace();  
7:    }  
8:    if (stmt != null) {  
9:     try {  
10:     rs.close();  
11:     } catch (Exception e2) {  
12:     e2.printStackTrace();  
13:     }  
14:    }  
15:    if (con != null) {  
16:     try {  
17:     rs.close();  
18:     } catch (Exception e2) {  
19:     e2.printStackTrace();  
20:     }  
21:    }  
22:    }  


Download the source codes(The database driver is included in the project):
http://www.mediafire.com/?9f6ka2y4ctp6630

This post goes dedicated to my two good colleges from college Tripo and Zoran.


Sunday, June 12, 2011

Using apache POI to write to word documents

A simple Hello World example for writing  into word files with apache POI
If you use maven add this 2 dependencies(Otherwise download and necessary libraries and add them to your build path):
 <dependency>   
   <groupId>org.apache.poi</groupId>   
   <artifactId>poi</artifactId>   
   <version>3.9</version>   
  </dependency>   
  <dependency>   
   <groupId>org.apache.poi</groupId>   
   <artifactId>poi-ooxml</artifactId>   
   <version>3.9</version>   
  </dependency>   

Here a simple Hello World! program:


 package com.djordje;   
  import java.io.File;   
  import java.io.FileOutputStream;   
  import org.apache.poi.xwpf.usermodel.XWPFDocument;   
  import org.apache.poi.xwpf.usermodel.XWPFParagraph;   
  import org.apache.poi.xwpf.usermodel.XWPFRun;   
  public class App {   
    public void newWordDoc(String filename, String fileContent)   
         throws Exception {   
       XWPFDocument document = new XWPFDocument();   
       XWPFParagraph tmpParagraph = document.createParagraph();   
       XWPFRun tmpRun = tmpParagraph.createRun();   
       tmpRun.setText(fileContent);   
       tmpRun.setFontSize(18);   
       FileOutputStream fos = new FileOutputStream(new File(filename + ".doc"));   
       document.write(fos);   
       fos.close();   
    }   
    public static void main(String[] args) throws Exception {   
         App app = new App();   
         app.newWordDoc("testfile", "Hello World!");   
    }   
  }   

Printing any text file in java(Trick)

If you want to find an easy way and fast way to print in using java any text file, you can use the desktop api to do it.(Note this is not the best approach, but can get you unstuck in certain occasions).


1:  public void print() {  
2:    //The desktop api can help calling other applications in our machine  
3:    //and also many other features...  
4:    Desktop desktop = Desktop.getDesktop();  
5:    try {  
6:    //desktop.print(new File("DocXfile.docx"));  
7:      desktop.print(new File("Docfile.pdf"));  
8:    } catch (IOException e) {        
9:      e.printStackTrace();  
10:    }  
11:  }  


Friday, June 10, 2011

HOW TO USE IMAGES IN A JEE6 PROJECT?(Most common approaches)


<h:graphicImage id="img" value="/images/download.gif" alt="The image could not be found."/> 

A browser loads each image by sending an HTTP request for the resource.
Resources that are under the WEB-INF directory can not be directly retrieved via an HTTP request.

You have several options:
1. Move the images directory such that it is under the WebContent directory, but is not under the WEB- INf directory. For example, *WebContent/images*


2.    Intercept requests for images in a servlet or filter, read the file from within the servlet or filter, then return the file. There are 3rd party implementations of this.If you dont want to write your own servlet for this, Im sure with a bit of search you can find a servlet that suits your needs in google.

HOW TO CREATE YOUR OWN CAPTCHA WITH JSF

1-Create a servlet

//This can be located at a package called servlets(next to entities and managed beans)
public
class MyCaptcha extends HttpServlet{

      private int height = 0;

    private int width = 0;

    public static final String CAPTCHA_KEY = "captcha_key_name";


   @Override

    public void init(ServletConfig config) throws ServletException {

        super.init(config);

        height = Integer.parseInt(getServletConfig().getInitParameter("height"));
        width = Integer.parseInt(getServletConfig().getInitParameter("width"));
    }

    @Override
    protected void doGet(HttpServletRequest req, HttpServletResponse response) throws IOException, ServletException {
        //Expire response
        response.setHeader("Cache-Control", "no-cache");
        response.setDateHeader("Expires", 0);
        response.setHeader("Pragma", "no-cache");
        response.setDateHeader("Max-Age", 0);

        BufferedImage image = new BufferedImage(width, height, BufferedImage.TYPE_INT_RGB);
        Graphics2D graphics2D = image.createGraphics();
        Hashtable<TextAttribute, Object> map = new Hashtable<TextAttribute, Object>();
        Random r = new Random();
        String token = Long.toString(Math.abs(r.nextLong()), 36);
        String ch = token.substring(0, 6);
        Color c = new Color(0.6662f, 0.4569f, 0.3232f);
       GradientPaint gp = new GradientPaint(30, 30, c, 15, 25, Color.white, true);
        graphics2D.setPaint(gp);
        Font font = new Font("Verdana", Font.CENTER_BASELINE, 26);
        graphics2D.setFont(font);
        graphics2D.drawString(ch, 2, 20);
        graphics2D.dispose();

        HttpSession session = req.getSession(true);
        session.setAttribute(CAPTCHA_KEY, ch);

        OutputStream outputStream = response.getOutputStream();
            ImageIO.write(image, "jpeg", outputStream);
        outputStream.close();
    }

}

2-Add the following settings to your web.xml:
<servlet>
            <servlet-name>Captcha</servlet-name>
            <servlet-class>servlets.MyCaptcha</servlet-class>
            <init-param>
                  <description>passing height</description>
                  <param-name>height</param-name>
                  <param-value>30</param-value>
            </init-param>
            <init-param>
                  <description>passing height</description>
                  <param-name>width</param-name>
                  <param-value>120</param-value>
            </init-param>
      </servlet>
      <servlet-mapping>
            <servlet-name>Captcha</servlet-name>
            <url-pattern>/Captcha.jpg</url-pattern>
      </servlet-mapping>

3- Add the captcha markup at the front page
<h:graphicImage id="capimg"
                                    value="#{facesContext.externalContext.requestContextPath}/../Captcha.jpg" />
                              <br />
                              <h:outputText value="*Napisite text koj vidite u slici " />
                              <h:inputText id="captchaSellerInput"
                                    value="#{registrationControllerSeller.captchaSellerInput}" />


4- Add the backing bean logic of the captha:

HttpServletRequest request = (HttpServletRequest) FacesContext
            .getCurrentInstance().getExternalContext().getRequest();
            Boolean isResponseCorrect = Boolean.FALSE;
            javax.servlet.http.HttpSession session = request.getSession();
            String parm = captchaSellerInput;
            String c = (String) session.getAttribute(MyCaptcha.CAPTCHA_KEY);
            if (parm.equals(c)) {
                 //CAPTCHA CORRECT INPUT
            }
           
else {
                //CAPTCHA INCORRECT INPUT  
            }


Glassfish 3 integrated database. What a great tool!

The database is one of the most important parts in almost every web project. It allows to store persistent data, for further use or analysis. Most of today web applications would be useless without a database.

Soon after starting using glassfish server, i discovered that there is a great tool already included in this server.
The Derby database. In this post i want to give you a quick tutorial, on how to configure it to be able to use it with your JEE6 application and the eclipse IDE.

STEP 1 DEFINE A DRIVER TO CONNECT TO APPACHE DERBY
The driver will be used by our web app to connect to the database, depending on the database vendor, the driver is different. The driver we need should be found in the glassfish application server file system.

Prerequisites:
Install appropriate versions of Eclipse, Data Tools Platform, EMG, GEF, and Apache Derby. If necessary, switch to the Database Development perspective.

You can also create the driver definition when creating the connection profile.
  1. Select Window > Preferences from the main menu bar.
  2. Expand Data Management > Connectivity and select Driver Definitions.
  3. Click Add.
  4. In the Name/Type tab, indicate the version of Derby on which you want to create the driver definition.
    1. Select Derby for the Vendor Filter to narrow the display to only Derby driver definitions
    2. Select Derby Embedded JDBC Driver for the version of Derby you have installed.
    3. (Optional) Modify the Driver Name if a driver definition with this name already exists.
  5. In the JAR List tab, highlight the default derby.jar file and click Edit JAR/Zip to indicate the fully qualified path of the Derby JAR file.
    1. Browse to the location of the ZIP file.
    2. Click Open.
  6. (Optional) In the Properties tab, modify the default properties for the driver definition template.
Note: Options in the Properties tab vary based on database server type. You can edit or enter a property in the Value box.

  1. Click OK.
 NOTE: THE driver.jar is for emdebed database while driverclient.jar is for normal database(driverclient should be used).
STEP 2 CREATE THE DATABASE
I found a great tutorial on using Glassfish v3 with Eclipse at http://programming.manessinger.com/tutorials/an-eclipse-glassfish-java-ee-6-tutorial/ . Here I will summarize how to create a Derby DB in eclipse and how to configure connection pool and JDBC resources using the Glassfish Administration Console.

Before doing this make sure that the Glassfish preference Start the JavaDB database process when Starting GlassFish Server is ticked.

First we have to create the Derby Database, in eclipse is very simple. Go in
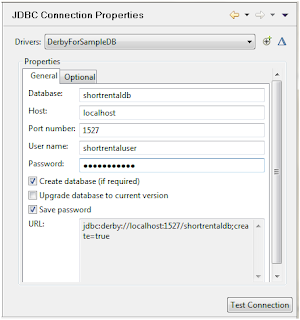
 Data Source Explorer tab and on the contextual menu of Database Connection select new. Now select Derby as Connection Profile Type and set the name of the database, for example ShortRental Database. 
Now in the next step set the database properties as in figure:


(Don’t close this window and click ok until you don’t finish in the administrator console)


Now start the GlassFish server and connect to the administration console (the default port is 4860) and go toResources / JDBC / Connection Pools. Now create a new Connection Pool. Set the parameters as in figure:

Now pass to the next step, leave the properties at bottom as they are, and set the advanced properties as in the Derby DB, see the next screenshot:


At this point the configuration is completed, make sure the Ping checkbox is enabled and now you can try to ping the database.

The last operation to do is to define a JNDI name for access the database. Go to
 Resources / JDBC / JDBC Resources, add a new one and connect it to the just cretaed pool.


The last step would be in our eclipse project add a new JDBC resource.(File>New>Other>JDBC Resource)


When interacting with the database, it is likely to get a JNDI error regarding to the pool name, to fix it you have set the attribute  pool-name to exact the same pool name as you gave in the glassfish admin panel. 
(Example: ShortRentalPool)

Share with your friends