1 2 3 4 5 6 7 8 9 10 11 12 13 14 15 16 17 18 19 20 21 22 23 24 25 26 27 28 29 30 31 32 33 34 35 36 37 38 39 40 41 42 43 44 45 46 47 48 49 50 51 52 53 54 55 56 57 58 59 60 61 62 63 64 65 66 67 68 69 70 71 72 73 74 75 76 77 78 79 80 81 82 83 | # alias management alias a='alias' alias ae='nano ~/.bashrc' alias s='source ~/.bashrc' #docker alias dR='ds;dr;dp;dip;dri;dl' alias dc='docker-compose up -d --build' alias de='sudo dockerd &' alias di='docker images -a' alias dip='docker images purge' alias dl='docker ps -s -a' alias dn='docker network create' alias dp='docker system prune --volumes && docker network prune' alias dpa='docker ps -a' alias dps='docker ps -s' alias dr='docker rm $(docker ps -a -q)' alias dri='docker rmi -f $(docker images -a -q)' alias ds='docker stop $(docker ps -a -q)' alias dst='docker start' alias gdc='g;dc' alias gx='./gradlew build -x test' # gradle and maven alias g='./gradlew clean build --rerun-tasks --no-build-cache' alias gt='./gradlew -q tasks' alias mci='mvn clean install' alias mc='mvn clean' alias mcp='mvn clean package' # java alias homej11='export JAVA_HOME=/usr/lib/jvm/java-11-openjdk-amd64/;echo $"JAVA_HOME set to:";echo $JAVA_HOME;s' alias homej8='export JAVA_HOME=/usr/lib/jvm/java-8-openjdk-amd64/;echo $"JAVA_HOME set to:";echo $JAVA_HOME;s' alias j11='sudo update-java-alternatives -s java-1.11.0-openjdk-amd64;jv;homej11' alias j8='sudo update-java-alternatives -s java-1.8.0-openjdk-amd64;jv;homej8' alias jv='java -version' # other alias l='ls -CF' alias la='ls -A' alias ll='ls -alF' alias w='cd ~/workspace' |

"Javing" is the present continuous form of "to program in Java". Here you will find: code snippets, examples, tips, tricks, tutorials, best practices, miscellaneous and much more. Enjoy your Javing!
Showing posts with label tips and tricks. Show all posts
Showing posts with label tips and tricks. Show all posts
Sunday, June 7, 2020
Ubuntu aliases backup
Just some of the aliases I use more freequently. I thought to back them up here in a blogpost.

Sunday, February 23, 2020
IntelliJ ultimate embedded http client
Did you know that IntelliJ ultimate has an embedded http client that you can use to sent requests to your app? There's no need for external tools like curl or postman, you can just use IntelliJ's endpoints tab. Also this requests can be saved as http files and be used on tests.
Tuesday, April 11, 2017
Checking that 2 Lists have elements in common
How many times have we created loops to check if any of the elements of one list are contained among any of the elements of other list?
Lists have a contains() and also a containsAll() methods but they doesn't seem to do what we want and we end up writing spaghetti that looks like this often:
Sometimes we forget that the Java API has so many useful things. Like this disjoint() method, from Collections.
Its not Java 8 ;) its being there for a bit already, have a look at this docs:
https://docs.oracle.com/javase/7/docs/api/java/util/Collections.html#disjoint(java.util.Collection,%20java.util.Collection)
Lists have a contains() and also a containsAll() methods but they doesn't seem to do what we want and we end up writing spaghetti that looks like this often:
1:  boolean isSafeToEat(List<String> allergicFoods) {
2:    for (String ingredient : getIngredients()) {
3:      if (allergicFoods.contains(ingredient)) {
4:        return false;
5:      }
6:    }
7:    return true;
8:  }
Sometimes we forget that the Java API has so many useful things. Like this disjoint() method, from Collections.
1:    boolean isSafeToEat(List<String> allergicFoods) {
2:      return Collections.disjoint(ingredients, allergicFoods);
3:    }
Its not Java 8 ;) its being there for a bit already, have a look at this docs:
https://docs.oracle.com/javase/7/docs/api/java/util/Collections.html#disjoint(java.util.Collection,%20java.util.Collection)
Refactor switch to Enum
Do switch statements sound good to you?
Trust me better switch to Enum before it destroys your ears ;)
Friday, April 7, 2017
Refactoring "Feature Envy" Code Smell
In this video I explain the "Feature Envy" Code Smell and how it can be refactored. Sorry I made a mistake in the screen casts and I just selected the window rather than the area, you can't see the pop up menus and auto suggest when I press Ctrl + Space. Sorry about that :(( It takes me some time to make videos but if I get the chance soon I will repeat the demo and re-upload it.
Thursday, June 9, 2016
Mockito ArgumentCaptor example
Lets observe the following class
If we were to test the method doSomething() what we would be interested in,
perhaps mostly is to make sure that the collaborator that it uses is reached and the appropriate
parameters are passed. We could do that very easily by just verifying on a mock
But there is a peculiar thing about this method. The argument that is passed into the collaborator
function doStuffWith() its using an object. Objects as its well known, contain other objects and/or
primitive variables. Since the object thing its being created internally in the method rather than be
injected(Its a hardwired dependency), we have no way of accurately knowing about it anything else but its type. So if we were curious about knowing more precisely about that object, what we would have to do is to spy on it. Mockito, allows us to spy on the objects that are passed to the mocks using a little tool called Argument Captor.
Let's have a look at how this test would look like if we were spying the object thing.
1 2 3 4 5 6 7 8 9 10 11 12 13 14 | public class MyService { private Collaborator collaborator; public MyService(Collaborator collaborator) { this.collaborator = collaborator; } public void doSomething() { Thing thing = new Thing(); thing.setType("ABC"); collaborator.doStuffWith(thing); } } |
If we were to test the method doSomething() what we would be interested in,
perhaps mostly is to make sure that the collaborator that it uses is reached and the appropriate
parameters are passed. We could do that very easily by just verifying on a mock
1 2 3 4 5 6 7 8 9 10 11 12 | public class MyServiceTest { private Collaborator collaborator = Mockito.mock(Collaborator.class); private MyService myService = new MyService(collaborator); @Test public void shouldDoSomething() throws Exception { myService.doSomething(); verify(collaborator).doStuffWith(any(Thing.class)); } } |
But there is a peculiar thing about this method. The argument that is passed into the collaborator
function doStuffWith() its using an object. Objects as its well known, contain other objects and/or
primitive variables. Since the object thing its being created internally in the method rather than be
injected(Its a hardwired dependency), we have no way of accurately knowing about it anything else but its type. So if we were curious about knowing more precisely about that object, what we would have to do is to spy on it. Mockito, allows us to spy on the objects that are passed to the mocks using a little tool called Argument Captor.
Let's have a look at how this test would look like if we were spying the object thing.
1 2 3 4 5 6 7 8 9 10 11 12 13 14 15 16 | public class MyServiceTest { private Collaborator collaborator = mock(Collaborator.class); private MyService myService = new MyService(collaborator); @Test public void shouldUseTheRightThing() throws Exception { ArgumentCaptor<Thing> argument = ArgumentCaptor.forClass(Thing.class); myService.doSomething(); verify(collaborator).doStuffWith(argument.capture()); assertThat(argument.getValue().getType(),is("ABC")); } } |
As you see, spying is an interesting way of in a non intrusive manner(without having to refactor), you can discover things about your code.
Now a question comes to our head. But declaring that object of type Thing in the method like that, is not an smell? Well, maybe but have in mind that if you were to inject that object from either the constructor or via a setter injection, we could say that you would be changing the api of the class. So that is not very good, because maybe you don't know if the clients that use the class are actually capable of providing the object thing or if would that even make sense form a design point of view.
To express this last point in a more pragmatical form, I am going to show you another 2 more intrusive refactoring to this class that could help you test that object, but that will need from you to sacrifice in design.
1 2 3 4 5 6 7 8 9 10 11 12 13 14 15 | public class MyService { private Collaborator collaborator; private ThingBuilder thingBuilder; public MyService(Collaborator collaborator, ThingBuilder builder) { this.collaborator = collaborator; this.thingBuilder = builder; } public void doSomething() { Thing thing = thingBuilder.withType("ABC").build(); collaborator.doStuffWith(thing); } } |
If you had a builder, you could mock it and train it, but you would pay a design price of having to add the builder to the constructor.
Even if you choose to use a setter to set the builder or keeping the original constructor as it is(so you don't affect the clients) and overloading, you are still sacrificing your design for the purpose of the test. Your test would also become more complex. It would look like this:
1 2 3 4 5 6 7 8 9 10 11 | @Test public void shouldUseTheRightThing() throws Exception { Thing thing = new Thing(); thing.setType("ABC"); when(thingBuilder.withType(anyString())).thenReturn(thingBuilder); when(thingBuilder.build()).thenReturn(thing); myService.doSomething(); verify(collaborator).doStuffWith(thing); } |
The other alternative I was thinking about would be to override equals and hashcode, so you could do a comparison in your test against a newly created object that would be the
expectation.
1 2 3 4 5 6 7 8 9 | @Test public void shouldUseTheRightThing() throws Exception { Thing thing = new Thing(); thing.setType("ABC"); myService.doSomething(); verify(collaborator).doStuffWith(thing); } |
It looks naive, but again is intrusive. You are adding 2 methods in your entity, just for the purpose of making the test green.
1 2 3 4 5 6 7 8 9 10 11 12 13 14 15 16 17 18 19 20 21 22 23 24 25 26 27 | public class Thing { private String type; public String getType() { return type; } public void setType(String type) { this.type = type; } @Override public boolean equals(Object o) { if (this == o) return true; if (o == null || getClass() != o.getClass()) return false; Thing thing = (Thing) o; return type != null ? type.equals(thing.type) : thing.type == null; } @Override public int hashCode() { return type != null ? type.hashCode() : 0; } } |
Saturday, April 30, 2016
null again! WTF(Wednesday Thursday Friday ;p)
1 2 3 4 5 6 7 8 9 10 | public class SomeClass { public void method(Something argument) { if(argument != null) { //Do stuff... } } } |
The above piece of code contains what we commonly refer to as a "verbose null check", in other words, validating that the incoming parameters exist. This is not a nice practice often because it tends to add noise to your code and also doing stuff and validating something, are different concerns and the methods in order to be clean, should be just caring about one thing.
People often wonder, what to do then to not let the null get any further. Let's have a look at some options.
Do nothing
One option is to just do nothing, the caller of the function, should be cautious and make sure not to pass a null. But if he does and this leads to a NullPointerException, this is a good way of knowing that the way that function is being used is wrong.
1 2 3 4 5 6 7 8 9 10 | public class SomeClass { public void method(Something argument) { //Do stuff... } } |
Using assertions
The java keyword 'assert' can be used in combination with a boolean expression to stop the program execution by throwing an assertion error. While this seems like an interesting alternative to the if statement, assertions are disabled by default in java. They are a nice debugging tool for those who want to use them with care. Sometimes some programmers will enable them during a bug fix, but they will always be disabled in the production environment.
1 2 3 4 5 6 7 8 9 10 | public class SomeClass { public void method(Something argument) { assert argument != null : "Can't pass a null"; //Do stuff... } } |
Null Object Pattern
The idea behind this behavioural design pattern is to use polymorphism to create null versions of an object(M.Fowler also refers to them as missing objects). This null objects will have a function called isNull(), which for the source class will always return false, but for the null object will return true. The client will be able to choose to pass a null object instead of a null, and this will avoid having to do a verbose null check in method().
public abstract class Something {

 // ...

 public boolean isNull() {
  return true;
 }
}
public class NullSomething extends Something {

 public boolean isNull() {
  return false;
 }
}


public class SomeClass {

 public void method(Something argument) {

  //Do something ...
 }
}
public class Client {

 private Something something;
 //...
 // The client avoids passing a null by using a null object
 if(something.isNull())
  someClass.method(new NullSomething());
 else
       someClass.method(something);
 //...
}
Optional
Latest versions of java have a class called Optional that can be used as a way of avoiding returning nulls. It is basically an implementation of the null object pattern. By using optional on the client we can avoid passing a null.
public class Client {

 private Optional<Something> something;

 //...

 if( ! something.isEmpty())
  someClass.method(something.get());
 //...

}

public class SomeClass {

 public void method(Something argument) {
  //Do stuff ...
 }
}
Validators, IllegalArgumentException and Business Exceptions
If the caller of the function is out of our control and we cannot be confident on the value that will pass to our function there are other alternatives to the null check that maybe regardless of also being defensive are probably more business friendly and perhaps more informative.
Validators
I mentioned at the beginning that methods should not have multiple responsibilities. If for whatever reason we must do that null check or some other type of validation, we could delegate it to a validator object.
public class SomeClass {

 private Validator validator;

 // ...
 public void method(Something argument) {
  if(validator.validate(argument))
  //Do stuff ...
  return;
 }
}
Sometimes this validator is also not seen as an smooth solution and probably an unnecessary dependency into the class. It could be replaced using the Decorator pattern. Basically a wrapper around the function being called by a decorating object.
Read more about it in another article from this blog:
http://javing.blogspot.co.uk/2013/10/can-you-please-wrap-gift-it-is-for-my.html
Illegal Argument Exception
NullPointerException its not a very informative exception for the client. So if we decide that we are not going to do any kind of null check but we are still afraid of the null, perhaps we could just throw an IllegalArgumentException instead.
public class SomeClass {

 // ...
 public void method(Something argument) {

         try {
             //Do stuff ...
         } catch(NullPointerException e) {
       throw new IllegalArgumentException(e);
         }
 }
}
It is not a good practice to catch runtime exceptions(aka. Swallowing exceptions), since as you know, the program just carries on working. It is highly recommended that if you are going to do something like this, at least you add a Logger.log() statement to help the developer that will be debugging in the case there is some problem.
Bussiness Exception
As I just mentioned in the previous alternative Runtime exceptions are not a good thing to catch. Instead of that, we could use Business/Declared exceptions, which will mandate the caller function to get ready(by adding try and catch blocks..) for a potential fault.
public class SomeClass {

 // ...
       public void method(Something argument) throws YouArePassingMeNothingException {

       try {
  //Do stuff ...
               } catch(NullPointerException e) {
   throw new YouArePassingMeNothingException(e);
  }
 }
}
Wednesday, January 6, 2016
Useful IntelliJ shortcuts in MacOs
December 2021 update
You can find more detailed information about my favourite shortcuts in this link:
Useful Shortcuts To Code In IntelliJ Without Mouse(mac)
I never find this post it when I need it so thats it, Im uploading it to the blog

You can find more detailed information about my favourite shortcuts in this link:
Useful Shortcuts To Code In IntelliJ Without Mouse(mac)
I never find this post it when I need it so thats it, Im uploading it to the blog


Sunday, December 13, 2015
Using pictures in your Acceptance Tests - (Yatspec + Selenium tip)
Today's article mainly dedicated to testers that often work with selenium and would like to learn how to add pictures to their selenium acceptance tests.
Some time ago I posted an article about an acceptance testing framework called Yatspec(Yet Another Test Specification) which is becoming very popular among the Java community: http://javing.blogspot.co.uk/2015/03/yet-another-blog-article-about.html
It is definitely worth researching deeper into this framework because it offer lots of interesting options to make beautiful live specifications.
The example I will present its very trivial and does not cover how to write an acceptance test, it just covers how to add images to an already existing Yatspec test.
Imagine that you had a method that whenever you called it at any point in the test, it takes an screen shoot for you and adds it to the report.

In order to demostrate, how it works, I created a class called GuiSeleniumAndYatspecTest that contains all the necessary Yatspec code and also a way of taking screen shoots.
There are some interesting things to notice in this class which will enable the usage of images in the yatspec acceptance test. Let's have a look at each:
Some time ago I posted an article about an acceptance testing framework called Yatspec(Yet Another Test Specification) which is becoming very popular among the Java community: http://javing.blogspot.co.uk/2015/03/yet-another-blog-article-about.html
It is definitely worth researching deeper into this framework because it offer lots of interesting options to make beautiful live specifications.
The example I will present its very trivial and does not cover how to write an acceptance test, it just covers how to add images to an already existing Yatspec test.
Imagine that you had a method that whenever you called it at any point in the test, it takes an screen shoot for you and adds it to the report.

In order to demostrate, how it works, I created a class called GuiSeleniumAndYatspecTest that contains all the necessary Yatspec code and also a way of taking screen shoots.
1 2 3 4 5 6 7 8 9 10 11 12 13 14 15 16 17 18 19 20 21 22 23 24 25 26 27 28 29 30 31 32 33 | @RunWith(SpecRunner.class) public class GuiSeleniumAndYatspecTest extends TestState implements WithCustomResultListeners { private static final String START_URL = "http://www.google.com"; protected WebDriver driver; protected static WebDriverBackedSelenium selenium; @Before public void setupSelenium() throws InterruptedException { driver = new FirefoxDriver(); selenium = new WebDriverBackedSelenium(driver, START_URL); selenium.open(START_URL); selenium.waitForPageToLoad("2000"); } @After public void closeSelenium() throws Exception { selenium.stop(); } public void takeScreenshoot() throws Exception { String imageData = selenium.captureScreenshotToString(); this.capturedInputAndOutputs.add(ScreenshootHolder.INTERESTING_GIVENS_KEY, new ScreenshootHolder(imageData)); System.out.println("Captured screen shoot"); } @Override public Iterable<SpecResultListener> getResultListeners() throws Exception { String testName = this.getClass().getSimpleName(); return Arrays.asList((SpecResultListener) new HtmlWithScreenshootResultListener(testName)); } } |
There are some interesting things to notice in this class which will enable the usage of images in the yatspec acceptance test. Let's have a look at each:
- The takeScreenshoot() method, does 2 things, the first its to transform an image taken via selenium into an String, and then passing that String to a class called ScreenshootHolder, that will transform it into a byte[] to be understood by Yatspec.
1 2 3 4 5 6 7 8 9 10 11 12 13 | public class ScreenshootHolder { public static final String INTERESTING_GIVENS_KEY = "Screenshot"; private final String base64PngDataString; public ScreenshootHolder(String base64PngImageData) { this.base64PngDataString = base64PngImageData; } public byte[] getPngImageData() { return org.apache.commons.codec.binary.Base64.decodeBase64(base64PngDataString); } } |
- Notice that the test case is implementing an interface called withCustomResultListener.
By using this interface, Yatspec will force us to override the method getResultListeners(), which is a mechanism to pass to Yatspec all the custom implementations for things we want our test to do, such as recoding images. The important thing in that method, is the usage of the class HtmlWithScreenshootResult, which is the implementation we need to create, to support the screenhoots.1 2 3 4 5 6 7 8 9 10 11 12 13 14 15 16 17
public class HtmlWithScreenshootResultListener implements SpecResultListener { private final ScreenshootRenderer screenShotRenderer; private HtmlResultRenderer delegate; public HtmlWithScreenshootResultListener(String testName) { delegate = new HtmlResultRenderer(); screenShotRenderer = new ScreenshootRenderer(testName); delegate.withCustomRenderer(ScreenshootHolder.class, screenShotRenderer); } @Override public void complete(File yatspecOutputDir, Result result) throws Exception { screenShotRenderer.setYatspecOutputDir(yatspecOutputDir); delegate.complete(yatspecOutputDir, result); } }
- Finally the Listener from before uses is an SpecResultListener, by implementing this interface, we can reach the output directories and the test result, via the complete(). The class ScreenshootRenderer, needs to be created to be able to set the output directory of the test and write the images to the temporary folder in the file system.
1 2 3 4 5 6 7 8 9 10 11 12 13 14 15 16 17 18 19 20 21 22 23 24 25 26 27 28 29 30 31 32
public class ScreenshootRenderer implements Renderer<ScreenshootHolder> {

    private File yatspecOutputDir;
    private String testName;

    public ScreenshootRenderer(String testName) {
        this.testName = testName;
    }

    @Override
    public String render(ScreenshootHolder screenshootHolder) throws Exception {
        if (yatspecOutputDir == null) {
            throw new IllegalStateException("You must use screenshootssupport.HtmlWithScreenShootResultListener in your test to use ScreenShotRenderer");
        } else {
            String imageFilename = yatspecOutputDir + File.separator + getImageName();
            try (FileOutputStream fos = new FileOutputStream(imageFilename)) {
                fos.write(screenshootHolder.getPngImageData());
            }
            System.out.println("Rendered screenshot to " + imageFilename);
            return String.format("<div class='nohighlight'><img src=\"%s\" alt=\"%s\"></img></div>", imageFilename, imageFilename);
        }
    }

    public void setYatspecOutputDir(File yatspecOutputDir) {
        this.yatspecOutputDir = yatspecOutputDir;
    }

    protected String getImageName() {
        String timestamp = Long.toString(System.currentTimeMillis());
        return String.format("test-%s-%s.png", testName, timestamp);
    }
}
It is useful to organise this implementations in a separate package, since they are specific just to the capture of images.
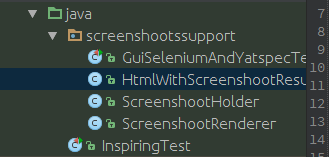
The acceptance tests now will display screenshots as a captured input or output:


The acceptance tests now will display screenshots as a captured input or output:

You can download this code examples from: https://github.com/SFRJ/yatspecscreenshoots
Thursday, December 10, 2015
Queries to explore a database you don't know much about - Oracle SQL quick ref 4
This is the last of the posts I will do for now on Oracle quick refereces.
I decided to write this 4 blog articles to save me time using Google in the future. So this last one is a bit peculiar, there are just a bunch of SQL commands that can be very useful for exploring a new database you don't know much about.
-- Finds all the columns in those tables that contain the string ESS
-- in the table name and orders them alphabetically
SELECT table_name, column_name
FROM ALL_TAB_COLS
WHERE table_name LIKE '%ESS%'
AND owner != 'MY_SCHEMA'
ORDER BY table_name;
-- Same as the previous one but includes more data and excludes the owner SYS
SELECT *
FROM ALL_TAB_COLS
WHERE table_name LIKE '%ESS%'
AND owner != 'SYS';
-- All the constraints for the tables in all schemas in the database
SELECT *
FROM all_constraints;
-- All the constraints for the tables in all an specific schema
SELECT *
FROM all_constraints
WHERE UPPER(r_owner) LIKE 'MY_SCHEMA';
-- All the foreign key constraints for the tables in all an specific schema
SELECT *
FROM all_constraints
WHERE UPPER(r_owner) LIKE 'MY_SCHEMA'
AND UPPER(constraint_type) LIKE 'R';
-- This finds the primary key of a table
SELECT UPPER(constraint_name)
FROM all_constraints
WHERE constraint_type IN ('P', 'U')
AND UPPER(table_name) LIKE UPPER(:r_table_name)
AND UPPER(owner) LIKE 'MY_SCHEMA';
-- Using the previous command as input to the following, allows us to find all of the
-- children of a particular table(Have as FK the PK of their parent)
SELECT table_name, constraint_name, status, owner
FROM all_constraints
WHERE UPPER(r_owner) LIKE 'MY_SCHEMA'
AND UPPER(constraint_type) LIKE 'R'
AND UPPER(r_constraint_name) IN
(
SELECT UPPER(constraint_name)
FROM all_constraints
WHERE constraint_type IN ('P', 'U')
AND UPPER(table_name) LIKE UPPER(:r_table_name)
AND UPPER(owner) LIKE 'MY_SCHEMA'
)
ORDER BY table_name, constraint_name;
--Find the parents of a table
SELECT *
FROM all_constraints
WHERE constraint_type IN ('P', 'U')
AND UPPER(owner) LIKE 'MY_SCHEMA'
AND UPPER(constraint_name) in
(
SELECT UPPER(r_constraint_name)
FROM all_constraints
WHERE UPPER(table_name) LIKE UPPER(:r_table_name)
AND UPPER(constraint_type) LIKE 'R'
);
--Finding tables that contain a word in their name
SELECT table_name, owner
FROM all_tables
WHERE UPPER(table_name) LIKE '%something%';
I decided to write this 4 blog articles to save me time using Google in the future. So this last one is a bit peculiar, there are just a bunch of SQL commands that can be very useful for exploring a new database you don't know much about.
-- Finds all the columns in those tables that contain the string ESS
-- in the table name and orders them alphabetically
SELECT table_name, column_name
FROM ALL_TAB_COLS
WHERE table_name LIKE '%ESS%'
AND owner != 'MY_SCHEMA'
ORDER BY table_name;
-- Same as the previous one but includes more data and excludes the owner SYS
SELECT *
FROM ALL_TAB_COLS
WHERE table_name LIKE '%ESS%'
AND owner != 'SYS';
-- All the constraints for the tables in all schemas in the database
SELECT *
FROM all_constraints;
-- All the constraints for the tables in all an specific schema
SELECT *
FROM all_constraints
WHERE UPPER(r_owner) LIKE 'MY_SCHEMA';
-- All the foreign key constraints for the tables in all an specific schema
SELECT *
FROM all_constraints
WHERE UPPER(r_owner) LIKE 'MY_SCHEMA'
AND UPPER(constraint_type) LIKE 'R';
-- This finds the primary key of a table
SELECT UPPER(constraint_name)
FROM all_constraints
WHERE constraint_type IN ('P', 'U')
AND UPPER(table_name) LIKE UPPER(:r_table_name)
AND UPPER(owner) LIKE 'MY_SCHEMA';
-- Using the previous command as input to the following, allows us to find all of the
-- children of a particular table(Have as FK the PK of their parent)
SELECT table_name, constraint_name, status, owner
FROM all_constraints
WHERE UPPER(r_owner) LIKE 'MY_SCHEMA'
AND UPPER(constraint_type) LIKE 'R'
AND UPPER(r_constraint_name) IN
(
SELECT UPPER(constraint_name)
FROM all_constraints
WHERE constraint_type IN ('P', 'U')
AND UPPER(table_name) LIKE UPPER(:r_table_name)
AND UPPER(owner) LIKE 'MY_SCHEMA'
)
ORDER BY table_name, constraint_name;
--Find the parents of a table
SELECT *
FROM all_constraints
WHERE constraint_type IN ('P', 'U')
AND UPPER(owner) LIKE 'MY_SCHEMA'
AND UPPER(constraint_name) in
(
SELECT UPPER(r_constraint_name)
FROM all_constraints
WHERE UPPER(table_name) LIKE UPPER(:r_table_name)
AND UPPER(constraint_type) LIKE 'R'
);
--Finding tables that contain a word in their name
SELECT table_name, owner
FROM all_tables
WHERE UPPER(table_name) LIKE '%something%';
Subquery basics - Oracle SQL quick ref 3
A sub-query is a query that is nested inside a SELECT, INSERT, UPDATE, or DELETE statement, or inside another sub-query. A sub-query is also called an inner query or inner select, while the statement containing a sub-query is also called an outer query or outer select.
Depending on the amount of results a sub-query returns, we distinguish 2 types of sub-queries:
In the following single sub-query example, the AVG function returns just one result which is used by the outer query.
SELECT employee_id, last_name, salary
FROM employees
WHERE salary > (SELECT AVG(salary) FROM employees)
ORDER BY salary;
In the next example a multiple row sub-query is used to return some departments which the outer query will use in its IN clause.
SELECT last_name, department_id, job_id
FROM employees
WHERE department_id IN (SELECT department_id
FROM departments
WHERE location_id=2897);
It is important that both single row and multiple row sub-queries are correctly used in a context that either expects a single result or a multiple result respectively.
Its important to mention that the Oracle server will always execute sub-queries first.
Sub-queries can be used in the WHERE clause, but also in the HAVING clause.
This example returns job with the lowest average salary.
SELECT job_id, AVG(salary)
FROM employees
GROUP BY job_id
HAVING AVG(salary) = (SELECT MIN(AVG(salary))
FROM employees
GROUP BY job_id);
The difference between HAVING and WHERE, is that WHERE does not work with aggregated functions, such as AVG, COUNT...
Depending on the amount of results a sub-query returns, we distinguish 2 types of sub-queries:
- Single row sub-queries: Queries that return only one row from the inner SELECT statement
- Multiple row sub-queries: Queries that return multiple rows from the inner SELECT statement
In the following single sub-query example, the AVG function returns just one result which is used by the outer query.
SELECT employee_id, last_name, salary
FROM employees
WHERE salary > (SELECT AVG(salary) FROM employees)
ORDER BY salary;
In the next example a multiple row sub-query is used to return some departments which the outer query will use in its IN clause.
SELECT last_name, department_id, job_id
FROM employees
WHERE department_id IN (SELECT department_id
FROM departments
WHERE location_id=2897);
It is important that both single row and multiple row sub-queries are correctly used in a context that either expects a single result or a multiple result respectively.
Its important to mention that the Oracle server will always execute sub-queries first.
Sub-queries can be used in the WHERE clause, but also in the HAVING clause.
This example returns job with the lowest average salary.
SELECT job_id, AVG(salary)
FROM employees
GROUP BY job_id
HAVING AVG(salary) = (SELECT MIN(AVG(salary))
FROM employees
GROUP BY job_id);
The difference between HAVING and WHERE, is that WHERE does not work with aggregated functions, such as AVG, COUNT...
Using Joins - Oracle SQL quick ref 2
NATURAL JOIN is a type of join that relies on both tables involved on the join to have a common column name. For example if an employee table has a foreign key called department_id and the departments table has a primary key called department_id, then it is possible to do a natural join because in both sides there is a column with the same name.
SELECT employee_id, last_name, department_id, department_name
FROM employees NATURAL JOIN departments;
Here another example, where both the locations and departments table, have location_id:
SELECT department_id, department_name, location_id, city
FROM departments NATURAL JOIN locations
WHERE department_id IN (20, 50);
There is a type of join, that uses the USING keyword. This Join, requires that the column that is used for the join is explicitly mentioned in the USING clause.
SELECT employee_id, last_name, location_id, department_id
FROM employees JOIN departments
USING (department_id);
When we use the USING keyword, we are allowed to use aliases if we want but the only limitation is that the WHERE clause cannot use aliases. For example, WHERE d.location_id... would not be valid.
SELECT l.city, d.department_name
FROM locations l JOIN departments d
USING (location_id)
WHERE location_id = 1400;
SELECT first_name, d.department_name, d.manager_id
FROM employees e JOIN departments d
USING (department_id)
WHERE department_id = 50;
The ON keyword is the most commonly used way of doing joins in this type of does not mandate that the columns in both sides have the same name, also there are no limitations in the usage of aliases in the WHERE clause.
SELECT e.employee_id, e.last_name, e.department_id, d.department_id, d.location_id
FROM employees e
JOIN departments d ON (e.department_id = d.department_id);
The JOIN clause has an AND part, which is equivalent to the WHERE clause, so WHERE is not needed but can also be used along side.
SELECT e.employee_id, e.last_name, e.department_id, d.department_id, d.location_id
FROM employees e
JOIN departments d ON (e.department_id = d.department_id)
AND e.manager_id=149;
SELECT e.employee_id, e.last_name, e.department_id, d.department_id, d.location_id
FROM employees e
JOIN departments d ON (e.department_id = d.department_id)
WHERE e.manager_id=149;
It is possible to have as many JOIN clauses as desired in a query.
SELECT e.last_name, e.job_id, e.department_id, d_depatment_name
FROM employees e
JOIN departments d ON (e.department_id = d.department_id)
JOIN locations l ON (d.location_id = l.location_id)
WHERE l.city = 'London';
Sometimes its necessary to perform self joins. In this example a non normalized table of employees, has a row to represent that the worker is a manager. So if we wanted to see who is the manager of who, we would have to do something like this.
SELECT worker.last_name emp, manager.last_name mgr
FROM employees worker
JOIN employees manager ON (worker.manager_id = manager.employee_id);
Also in SQL, there are other types of joins called OUTER and INNER that are useful when we want to widen or narrow the result set. INNER JOIN will only return rows, if both tables in the join have associated data in the other side of the join. OUTER JOIN is not that strict, they will still return rows even if they have no associated data in the other side of the join. While there is one type of INNER JOIN, the OUTER JOIN cam come in 3 flavours(LEFT,RIGHT, FULL).
The LEFT OUTER JOIN will include all employees and their department name even if they don't have an associated department.
SELECT e.last_name, e.department_id, d.department_name
FROM employees e LEFT OUTER JOIN departments d
ON (e.department_id = d.department_id);
The RIGHT OUTER JOIN will include all the departments that are associated with employees, but also all the departments that are not associated with employees at all.
SELECT e.last_name, e.department_id, d.department_name
FROM employees e RIGHT OUTER JOIN departments d
ON (e.department_id = d.department_id);
The FULL OUTER JOIN will return all the departments even if they are not associated with employees and also all the employees even if they are not associated with departments.
SELECT e.last_name, e.department_id, d.department_name
FROM employees e FULL OUTER JOIN departments d
ON (e.department_id = d.department_id);
The INNER JOIN will return all results that have employees with departments and all departments with employees.
SELECT e.last_name, e.department_id, d.department_name
FROM employees e INNER JOIN departments d
ON (e.department_id = d.department_id);

SELECT employee_id, last_name, department_id, department_name
FROM employees NATURAL JOIN departments;
Here another example, where both the locations and departments table, have location_id:
SELECT department_id, department_name, location_id, city
FROM departments NATURAL JOIN locations
WHERE department_id IN (20, 50);
There is a type of join, that uses the USING keyword. This Join, requires that the column that is used for the join is explicitly mentioned in the USING clause.
SELECT employee_id, last_name, location_id, department_id
FROM employees JOIN departments
USING (department_id);
When we use the USING keyword, we are allowed to use aliases if we want but the only limitation is that the WHERE clause cannot use aliases. For example, WHERE d.location_id... would not be valid.
SELECT l.city, d.department_name
FROM locations l JOIN departments d
USING (location_id)
WHERE location_id = 1400;
SELECT first_name, d.department_name, d.manager_id
FROM employees e JOIN departments d
USING (department_id)
WHERE department_id = 50;
The ON keyword is the most commonly used way of doing joins in this type of does not mandate that the columns in both sides have the same name, also there are no limitations in the usage of aliases in the WHERE clause.
SELECT e.employee_id, e.last_name, e.department_id, d.department_id, d.location_id
FROM employees e
JOIN departments d ON (e.department_id = d.department_id);
The JOIN clause has an AND part, which is equivalent to the WHERE clause, so WHERE is not needed but can also be used along side.
SELECT e.employee_id, e.last_name, e.department_id, d.department_id, d.location_id
FROM employees e
JOIN departments d ON (e.department_id = d.department_id)
AND e.manager_id=149;
SELECT e.employee_id, e.last_name, e.department_id, d.department_id, d.location_id
FROM employees e
JOIN departments d ON (e.department_id = d.department_id)
WHERE e.manager_id=149;
It is possible to have as many JOIN clauses as desired in a query.
SELECT e.last_name, e.job_id, e.department_id, d_depatment_name
FROM employees e
JOIN departments d ON (e.department_id = d.department_id)
JOIN locations l ON (d.location_id = l.location_id)
WHERE l.city = 'London';
Sometimes its necessary to perform self joins. In this example a non normalized table of employees, has a row to represent that the worker is a manager. So if we wanted to see who is the manager of who, we would have to do something like this.
SELECT worker.last_name emp, manager.last_name mgr
FROM employees worker
JOIN employees manager ON (worker.manager_id = manager.employee_id);
Also in SQL, there are other types of joins called OUTER and INNER that are useful when we want to widen or narrow the result set. INNER JOIN will only return rows, if both tables in the join have associated data in the other side of the join. OUTER JOIN is not that strict, they will still return rows even if they have no associated data in the other side of the join. While there is one type of INNER JOIN, the OUTER JOIN cam come in 3 flavours(LEFT,RIGHT, FULL).
The LEFT OUTER JOIN will include all employees and their department name even if they don't have an associated department.
SELECT e.last_name, e.department_id, d.department_name
FROM employees e LEFT OUTER JOIN departments d
ON (e.department_id = d.department_id);
The RIGHT OUTER JOIN will include all the departments that are associated with employees, but also all the departments that are not associated with employees at all.
SELECT e.last_name, e.department_id, d.department_name
FROM employees e RIGHT OUTER JOIN departments d
ON (e.department_id = d.department_id);
The FULL OUTER JOIN will return all the departments even if they are not associated with employees and also all the employees even if they are not associated with departments.
SELECT e.last_name, e.department_id, d.department_name
FROM employees e FULL OUTER JOIN departments d
ON (e.department_id = d.department_id);
The INNER JOIN will return all results that have employees with departments and all departments with employees.
SELECT e.last_name, e.department_id, d.department_name
FROM employees e INNER JOIN departments d
ON (e.department_id = d.department_id);

Grouping data - Oracle SQL quick ref 1
Oracle SQL group functions operate on sets of rows to give one result per group of inputs(In other words, many inputs, one output): AVG,COUNT,MAX,MIN,SUM...
SELECT MAX(salary) max, MIN(salary) min, SUM(salary) sum, ROUND(AVG(salary),0) avg
FROM employees;
SELECT COUNT(*) numberOfEmployees
FROM employees;
Sometimes the rows of data, may contain duplications that we don't want to be taken into account.
Then the DISTINCT keyword, can be useful to suppress the duplicates.
SELECT COUNT(DISTINCT department_id)
FROM employees
By default group functions will ignore null values but if we want to not ignore then, we should use the NVL function.
SELECT NVL(AVG(commission_pct))
FROM employees;
It is possible in sql to select different groups/sub sets of data, from one same table, this is know as grouping. The GROUP BY keyword allows us to divide the rows of a table into groups and optionally latter apply a group function to act upon each of those groups.
For example, we could get the average salary for each department using the group by function:
SELECT department_id, AVG(salary)
FROM employees
GROUP BY department_id;
Important!: If a SELECT statement contains a GROUP BY clause, all non aggregate functions(department_id) that are defined in the SELECT, need to also be in the GROUP BY clause.
When working with GROUP BY and we want to add additional restrictions to the groups, we are not allowed to use the WHERE clause, instead we must use the HAVING clause.
For example lets say that we want to see the departments and their max salaries, but only if the max salary of the department is greater than 10000:
SELECT department_id, MAX(salary)
FROM employees
GROUP BY department_id
HAVING MAX(salary)>10000;
SELECT MAX(salary) max, MIN(salary) min, SUM(salary) sum, ROUND(AVG(salary),0) avg
FROM employees;
SELECT COUNT(*) numberOfEmployees
FROM employees;
Sometimes the rows of data, may contain duplications that we don't want to be taken into account.
Then the DISTINCT keyword, can be useful to suppress the duplicates.
SELECT COUNT(DISTINCT department_id)
FROM employees
By default group functions will ignore null values but if we want to not ignore then, we should use the NVL function.
SELECT NVL(AVG(commission_pct))
FROM employees;
It is possible in sql to select different groups/sub sets of data, from one same table, this is know as grouping. The GROUP BY keyword allows us to divide the rows of a table into groups and optionally latter apply a group function to act upon each of those groups.
For example, we could get the average salary for each department using the group by function:
SELECT department_id, AVG(salary)
FROM employees
GROUP BY department_id;
Important!: If a SELECT statement contains a GROUP BY clause, all non aggregate functions(department_id) that are defined in the SELECT, need to also be in the GROUP BY clause.
When working with GROUP BY and we want to add additional restrictions to the groups, we are not allowed to use the WHERE clause, instead we must use the HAVING clause.
For example lets say that we want to see the departments and their max salaries, but only if the max salary of the department is greater than 10000:
SELECT department_id, MAX(salary)
FROM employees
GROUP BY department_id
HAVING MAX(salary)>10000;
Saturday, November 14, 2015
Using VisualVm to find a thread leak
A leak is when a application does not release references to a thread object properly. Due to this some Threads do not get garbage collected and the number of unused threads grow with time. Thread leak can often cause serious issues on a Java application since over a period of time too many threads will be created but not released and may cause applications to respond slow or hang.
In this article I am going to show how to perform a routine inspection of an application to find a thread leak. The first thing we will need is some sort of tool that could help us monitor the virtual machine of the running application. There is a very widely used tool, called VisualVm. It comes with the JDK but also can be downloaded separately in any OS.
Java visual vm is a profiling tool that comes with the jdk and can be used to monitor your running applications. But in order to be able to connect to your app using visualVm, you will have to include a few parameters to your start script.

So if the app is configured and running, all you have to do is use visualVm to remotely connect to the correct host and port.


In this article I am going to show how to perform a routine inspection of an application to find a thread leak. The first thing we will need is some sort of tool that could help us monitor the virtual machine of the running application. There is a very widely used tool, called VisualVm. It comes with the JDK but also can be downloaded separately in any OS.
Java visual vm is a profiling tool that comes with the jdk and can be used to monitor your running applications. But in order to be able to connect to your app using visualVm, you will have to include a few parameters to your start script.

java
-Dcom.sun.management.jmxremote
-Dcom.sun.management.jmxremote.port=8333
-Dcom.sun.management.jmxremote.local.only=false
-Dcom.sun.management.jmxremote.authenticate=false
-Dcom.sun.management.jmxremote.ssl=false
-jar myApp.jar

Once you connect to your application via visualVm, you can browse the diferent tabs and look for relevant information related to the VM and the threads. It will be very useful to also install a plugin for visual vm, called thread inspector which will allow you to examine in depth the running threads. You will be able to find the plugin in Tools>Plugins>Search for Thread Inspector

When there is a thread leak, often we will see an unusual large amounts one same type of thread visualVm's threads tab. If we double click in any of those threads, the plugin will show us more details about the class creating that thread.

Go to your source codes and place a break point in the class constructor.

Now run your debugger in one of your acceptance tests and observe. The frames tab will highlight a bit brighter the methods in your source codes that are creating the thread.

Hopefully the debugger will help you pinpoint the cause of the issue so you can fix it.
In the given example, the cause of this leak was that a Jersey DI configured to create some instances of a pool per request and this was consuming the resources. The solution is either to make that injection Singleton or not do it at all if it is not needed(which hapen to be the case).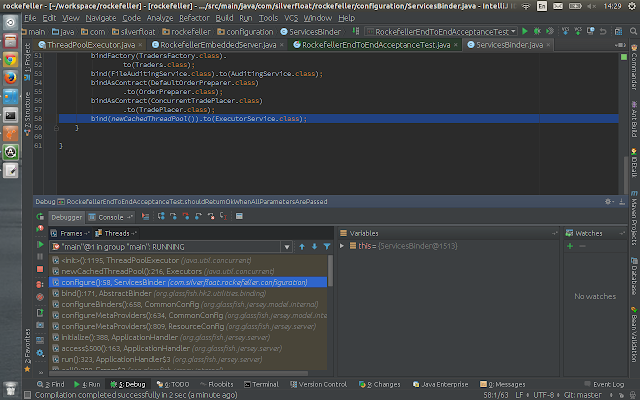
In the given example, the cause of this leak was that a Jersey DI configured to create some instances of a pool per request and this was consuming the resources. The solution is either to make that injection Singleton or not do it at all if it is not needed(which hapen to be the case).

Finally, you could run visualVm again in your local running app to verify that there is no leakage before release. Running the acceptance test is probably not enough because you want to see if the leakage is there, so best is to run the app in a local or test environment.
For further reading and more detailed usage instructions see:
https://visualvm.java.net/gettingstarted.htmlSunday, November 1, 2015
installing jenkins in ubuntu server 14.04
What better way of spending a beautiful Sunday than to trying to discover how to configure Jenkins in Ubuntu server 14.4 for 3 hours(Can you feel the sarcasm?...). Anyway this post is just to avoid similar frustrations in the future, this brief summary should do the job, just copy paste all the commands and you will have jenkins working in your server
Jenkins installation steps
Running Jenkins
After installing instalation is complete.
There will be a hidden directory under your /home/username called ./jenkins
This directory contains all the jobs and other configurations.
When we want to run jenkins we need to run as our username(should not run as root because it would be taking the configs from /var/lib/jenkins/jobs), from the directory:
/usr/share/jenkins/
using the command:
nohup java -jar jenkins.war --httpPort=5001 &
You can less nohup.out to see the log of the nohup command
Jenkins installation steps
 wget -q -O - https://jenkins-ci.org/debian/jenkins-ci.org.key | sudo apt-key add -
 sudo sh -c 'echo deb http://pkg.jenkins-ci.org/debian binary/ > /etc/apt/sources.list.d/jenkins.list'
 sudo apt-get update
 sudo apt-get install jenkins
Running Jenkins
After installing instalation is complete.
There will be a hidden directory under your /home/username called ./jenkins
This directory contains all the jobs and other configurations.
When we want to run jenkins we need to run as our username(should not run as root because it would be taking the configs from /var/lib/jenkins/jobs), from the directory:
/usr/share/jenkins/
using the command:
nohup java -jar jenkins.war --httpPort=5001 &
You can less nohup.out to see the log of the nohup command
Subscribe to:
Posts (Atom)