Acceptance
tests are tests conducted to determine if the requirements of a
specification are met.
In modern software development, we call
this specification, acceptance criteria.
“Whenever
possible” it would be desirable to acceptance test, the system end
to end.
By end to end, I mean talking to the system from the
outside, through its interfaces.
Note
that at the beginning of the previous paragraph, I said “Whenever
possible”.
The reason for this, is that it would be risky and
also costly to integration test our code(against other code, we don't
control/own). Sometime applications within a system, don't even
belong to our company or they are too costly and slow to run.
Because of this, the amount of system full stack tests/functional
tests, should be very reduced/almost none.
In
acceptance testing we often start from an assumption about those
external systems we cannot control. The parts out of our control are
faked and the acceptance criteria, is aimed to those parts we
control.
When
writing an acceptance test, there is a commonly used format to
define the acceptance criteria. It is well known as the
“given,when,then” format:
-
given: The setup/preconditions, of the scenario that we will test. Its contains what is that we expect from those remote systems(either internal or
external) on which we depend.
- when:
Is the specific call to the exposed interface we are testing.
- then:
Is the validation of the results.
Today's
acceptance test are written with the help of live specification
frameworks, such as: Jbehave, Fit, Fitnesse, Concordion, Yatspec...
The use
out this tools, will make easier to both understand complex scenarios
and maintain criteria.
Understanding
Yatspec
Next I will talk about writing acceptance tests with a popular live
specification framework called Yatspec. I will explain some of its
features and describe the way it presents the test report. Also I
will explain with an example how we could stub systems out of our
control and use them in our acceptance test.
About
yatspec
-its a Live
specification framework for Java(https://code.google.com/p/yatspec/)
-produces readable Html
-supports table/parametrized tests
-allows writing in given-when-then style
The
scenario
The application we will be testing, will receive a GET request from a
client, then it will send subsequent GET requests to two remote
systems(A and B), process the responses and POST the result to a
third system(C), just before returning it to the client.
The
criteria
-Given System A will reply 1 2 3
-And System B will reply 4 5 6
-When the client asks for the known odd numbers
-Then the application responds 1 3 5
-Then
'System C' receives 1 3 5
Creating
html reports
Before going in depth into our example, I want to expend some time
discussing how Yatspec reports look like, and what are the basics in
order to create them(If you want to go directly to the scenario
implementation, just skip this section).
When a Yatspec
specifications are run, it will generate a html report. Advance
options, can allow you to publish it remotely, but by default it will
be written to a temporary file in the file system.
The terminal
will tell you where it is like this:
Yatspec output:
/tmp/acceptancetests/KnownOddNumbersTest.html
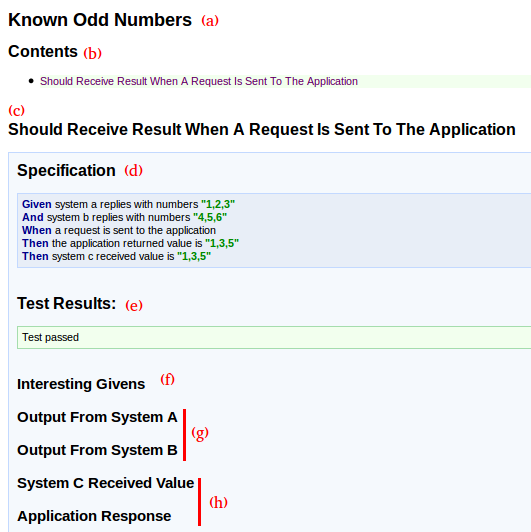
Lets have a look at how it is structured:
(a)
Is the title of the report. If Yatspec finds the postfix 'Test' on
the class name, it will remove it and just present the rest of the
title.
 @RunWith(SpecRunner.class)
 public class KnownOddNumbersTest extends TestState {
      //Your tests
 ...
 }
(b)
In the contents section you will see a summary of all the test
names(There can be multiple tests) in the same specification.
(c)This
is the test name. We
don't need to add any additional, anotations, all we need is to write
our test names in “camel case”. If
the test throws any exception, it will not be shown in the report.
 @Test
 public void shouldReceiveResultWhenARequestIsSentToTheApplication() throws Exception {
       //Test body...
 }
(d)
At the beginning of each test, the
criteria will
be presented. Yatspec will use the contents of the method body to
generate it. The methods given(), and(), when(), then() are
inherited from TestState.java(latter I will explain how to use them).
 @Test
   public void shouldReceiveResultWhenARequestIsSentToTheApplication() throws Exception {
     given(systemARepliesWithNumbers("1,2,3"));
     and(systemBRepliesWithNumbers("4,5,6"));
     when(aRequestIsSentToTheApplication());
     then(theApplicationReturnedValue(), is("1,3,5"));
     then(systemCReceivedValue(),is("1,3,5"));
   }
(e)
This is where test result
will be shown. Yatspec will colour this part in green if the test
passes , in red if the test fail or in orange it the test is not run.
(f)Interesting
givens are the preconditions for the test to run. This preconditions
are stored in the class TestState.java in an object called
interestingGivens. The way we would commonly do this by passing a
GivensBuilder object to the the method given(). Also the method and()
can be used to add more information in our interesting givens.
 @Test
   public void shouldReceiveResultWhenARequestIsSentToTheApplication() throws Exception {
     given(systemARepliesWithNumbers("1,2,3"));
     and(systemBRepliesWithNumbers("4,5,6"));
     //...
   }
   private GivensBuilder systemARepliesWithNumbers(String numbers) {
     return givens -> {
       givens.add("system A returns", numbers);
       return givens;
     };
   }
   private GivensBuilder systemBRepliesWithNumbers(String numbers) {
     return givens -> {
       givens.add("system B returns", numbers);
       return givens;
     };
   }
(g)
This are the captured inputs and outputs. Its purpose is to record
values that go in or out of any component
in the workflow.
TestState.java contains an object called capturedInputsAndOutputs to
which we can add or query from. Comonly we would indirectly add a
value to the capturedInputsAndOutputs to track the response of our
application so it can be verified latter, via a parameter of type
ActionUnderTest.java to the when() clause method.
 @Test
   public void shouldReceiveResultWhenARequestIsSentToTheApplication() throws Exception {
     //...
     when(aRequestIsSentToTheApplication());
     //...
   }
 private ActionUnderTest aRequestIsSentToTheApplication() {
     return (givens, captured) -> {
 //The second object of this lambda is capturedInputsAndOutputs
       captures.add("application response", newClient()
           .target("http://localhost:9999/")
           .request().get().readEntity(String.class));
       return captures;
     };
   }
(h)
This are the final
verifications. They are created by the then() method. You will
distinguish if the output was generated by the then() method, because
it is not highlighted in yellow.
An StateExtractor.java is
responsible for the values in this section. The state extractor will
take from the captures the values that where recorded previously so a
matcher can verify if they are correct.
 @Test
   public void shouldReceiveResultWhenARequestIsSentToTheApplication() throws Exception {
     //...
     then(theApplicationReturnedValue(), is("1,3,5"));
   }
 private StateExtractor<String> theApplicationReturnedValue() {
     return captures -> captures.getType("application response", String.class);
   }
 }

The
scenario implementation
Now
that we understand the criteria and we have some basic understanding
of Yatspec reports. Lets
write an acceptance test for the criteria described before.
In
our scenario System A, B and C are out of our control(Lets imagine
they are owned by companies). We need to first query A and B and
then send the processed result to C before replying to the client.
This means that our interesting givens will be the values
returned from A and B and our captured inputs and outputs will
contain the input into C.
So
let's have a look at how Systems A and B return the values previously
saved in the interesting givens to the application and also how
System C captures the input.
For
this example, I created a class called FakeServerTemplate.java which
contains the boiler plate code that is necessary to create an
embedded server. Each System A, B and C will inherit from it and
provide specific handler implementations.
 public abstract class FakeSystemTemplate {
   private final HttpServer server;
   protected InterestingGivens givens;
   protected CapturedInputAndOutputs captures;
   public FakeSystemTemplate(int port, String context,InterestingGivens givens, CapturedInputAndOutputs captures) throws IOException {
     this.givens = givens;
     this.captures = captures;
     InetSocketAddress socketAddress = new InetSocketAddress(port);
     server = HttpServer.create(socketAddress,0);
     server.createContext(context, customHandler());
     server.start();
   }
   public abstract HttpHandler customHandler();
   public void stopServer() {
     server.stop(0);
   }
 }
Latter,
when we create the acceptance test we will see how we will pass the
interesting givens and the captured inputs and outputs to the
Systems.
Systems
A and B will return the values stored in the interesting givens using
a unique key(Latter we will see how this keys are set in the givens).
 public class SystemA extends FakeSystemTemplate {
   public SystemA(int port, String context, InterestingGivens interestingGivens, CapturedInputAndOutputs capturedInputAndOutputs) throws IOException {
     super(port, context, interestingGivens, capturedInputAndOutputs);
   }
   @Override
   public HttpHandler customHandler() {
     return httpExchange -> {
       String response = givens.getType("system A returns", String.class);
       httpExchange.sendResponseHeaders(200, response.length());
       OutputStream outputStream = httpExchange.getResponseBody();
       outputStream.write(response.getBytes());
       outputStream.close();
       httpExchange.close();
       captures.add("output from system A", response);
     };
   }
 }
 public class SystemB extends FakeSystemTemplate {
   public SystemB(int port, String context, InterestingGivens interestingGivens, CapturedInputAndOutputs capturedInputAndOutputs) throws IOException {
     super(port, context, interestingGivens, capturedInputAndOutputs);
   }
   @Override
   public HttpHandler customHandler() {
     return httpExchange -> {
       String response = givens.getType("system B returns", String.class);
       httpExchange.sendResponseHeaders(200, response.length());
       OutputStream outputStream = httpExchange.getResponseBody();
       outputStream.write(response.getBytes());
       outputStream.close();
       httpExchange.close();
       captures.add("output from system B", response);
     };
   }
 }
For
system C we will be capturing the arriving input.
 public class SystemC extends FakeSystemTemplate {
   public SystemC(int port, String context, InterestingGivens interestingGivens, CapturedInputAndOutputs capturedInputAndOutputs) throws IOException {
     super(port, context, interestingGivens, capturedInputAndOutputs);
   }
   @Override
   public HttpHandler customHandler() {
     return httpExchange -> {
       Scanner scanner = new Scanner(httpExchange.getRequestBody());
       String receivedMessage = "";
       while(scanner.hasNext()) {
         receivedMessage += scanner.next();
       }
       scanner.close();
       httpExchange.sendResponseHeaders(200, 0);
       httpExchange.close();
       captures.add("system C received value", receivedMessage);
     };
   }
 }
Now
that our remote systems are ready, lets write our test.
 @RunWith(SpecRunner.class)
 public class KnownOddNumbersTest extends TestState {
   private SystemA systemA;
   private SystemB systemB;
   private SystemC systemC;
   private Application application;
   @Before
   public void setUp() throws Exception {
     systemA = new SystemA(9996, "/", interestingGivens, capturedInputAndOutputs);
     systemB = new SystemB(9997, "/", interestingGivens, capturedInputAndOutputs);
     systemC = new SystemC(9998, "/", interestingGivens, capturedInputAndOutputs);
     application = new Application(9999, "/");
   }
   @After
   public void tearDown() throws Exception {
     systemA.stopServer();
     systemB.stopServer();
     systemC.stopServer();
     application.stopApplication();
   }
   @Test
   public void shouldReceiveResultWhenARequestIsSentToTheApplication() throws Exception {
     given(systemARepliesWithNumbers("1,2,3"));
     and(systemBRepliesWithNumbers("4,5,6"));
     when(aRequestIsSentToTheApplication());
     then(theApplicationReturnedValue(), is("1,3,5"));
     then(systemCReceivedValue(),is("1,3,5"));
   }
 }
By
extending TestState.java we get acces to the interestingGivens and
capturedInputsAndOutputs objects. We will pass them to the remote
systems, this way Systems A and B will be aware of what we expect
them to return and also C will be able to capture its input.
The
methods used inside given(), and(), when() then() are just static
fixture methods. I think it good to avoid making long classes so
that's why the test class just contains the test, everything else is
extracted into reusable fixture methods. Lets have a look at them.
 public class GivensFixture {
   public static GivensBuilder systemARepliesWithNumbers(String numbers) {
     return givens -> {
       givens.add("system A returns", numbers);
       return givens;
     };
   }
   public static GivensBuilder systemBRepliesWithNumbers(String numbers) {
     return givens -> {
       givens.add("system B returns", numbers);
       return givens;
     };
   }
  public class WhenFixture {
   public static ActionUnderTest aRequestIsSentToTheApplication() {
     return (givens, captures) -> {
       captures.add("application response", newClient().target("http://localhost:9999/").request().get().readEntity(String.class));
       return captures;
     };
   }
 }
 public class ThenFixture {
   public static StateExtractor<String> theApplicationReturnedValue() {
     return captures -> captures.getType("application response", String.class);
   }
   public static StateExtractor<String> systemCReceivedValue() {
     return captures -> captures.getType("system C received value", String.class);
   }
 }
Once we
run the application, the acceptance test would go red, the next thing
to do if we were parcticing ATDD, would be to go into the production
code and write unit tests to guide the creation of the code that is
required to make the acceptance go green. Remember the ATDD cycle.
The TDD
of the final solution is out of the scope for this blog post, but you
can find all the completed codes at this git repo: